Posted on

Why use VIAIR on board systems??

Assured Automotive Company offers the most comprehensive line of VIAIR air compressors & air accessories for both the on-and off-road markets available anywhere.

The quality engineered compressors and components are also used in the OEM segment, and have become the industry standard for both 12- and 24-volt automotive aftermarket applications worldwide.

VIAIR compressors are currently deployed to every corner of the Globe; in the world’s harshest environments from arctic climates to the world’s most unforgiving deserts in a multitude of applications.

VIAIR products Viair On Board Air are currently used by 12 of the Fortune 500 Companies (Non-Automotive), in market segments ranging from Oil Service to Aerospace, from Agriculture to Healthcare. VIAIR Corporation is recognized by its customers and peers alike as the leading manufacturer of high performance air compressors for mobile pneumatic applications.

Like Assured Automotive Company, VIAIR’s goal is to consistently deliver performance, reliability and value to our customers. Also providing the ultimate Vital Air Source – the heart of any mobile pneumatic system to our valued partners worldwide.

Assured Automotive Company not only will supply the user with their needs, but at a great price. With a knowledge and experience in the on board applications.

Assured Automotive Company has in the past carried many different brand 12v air systems.  The other brands did not hold up well and was a constant warranty issue for the company.  In 2007 Assured Automotive Company decided to only carry the most reliable units, VIAIR.  Assured Automotive Company knows the in and outs of all the components.  It is that knowledge that helps the consumer make the correct choice time after time.

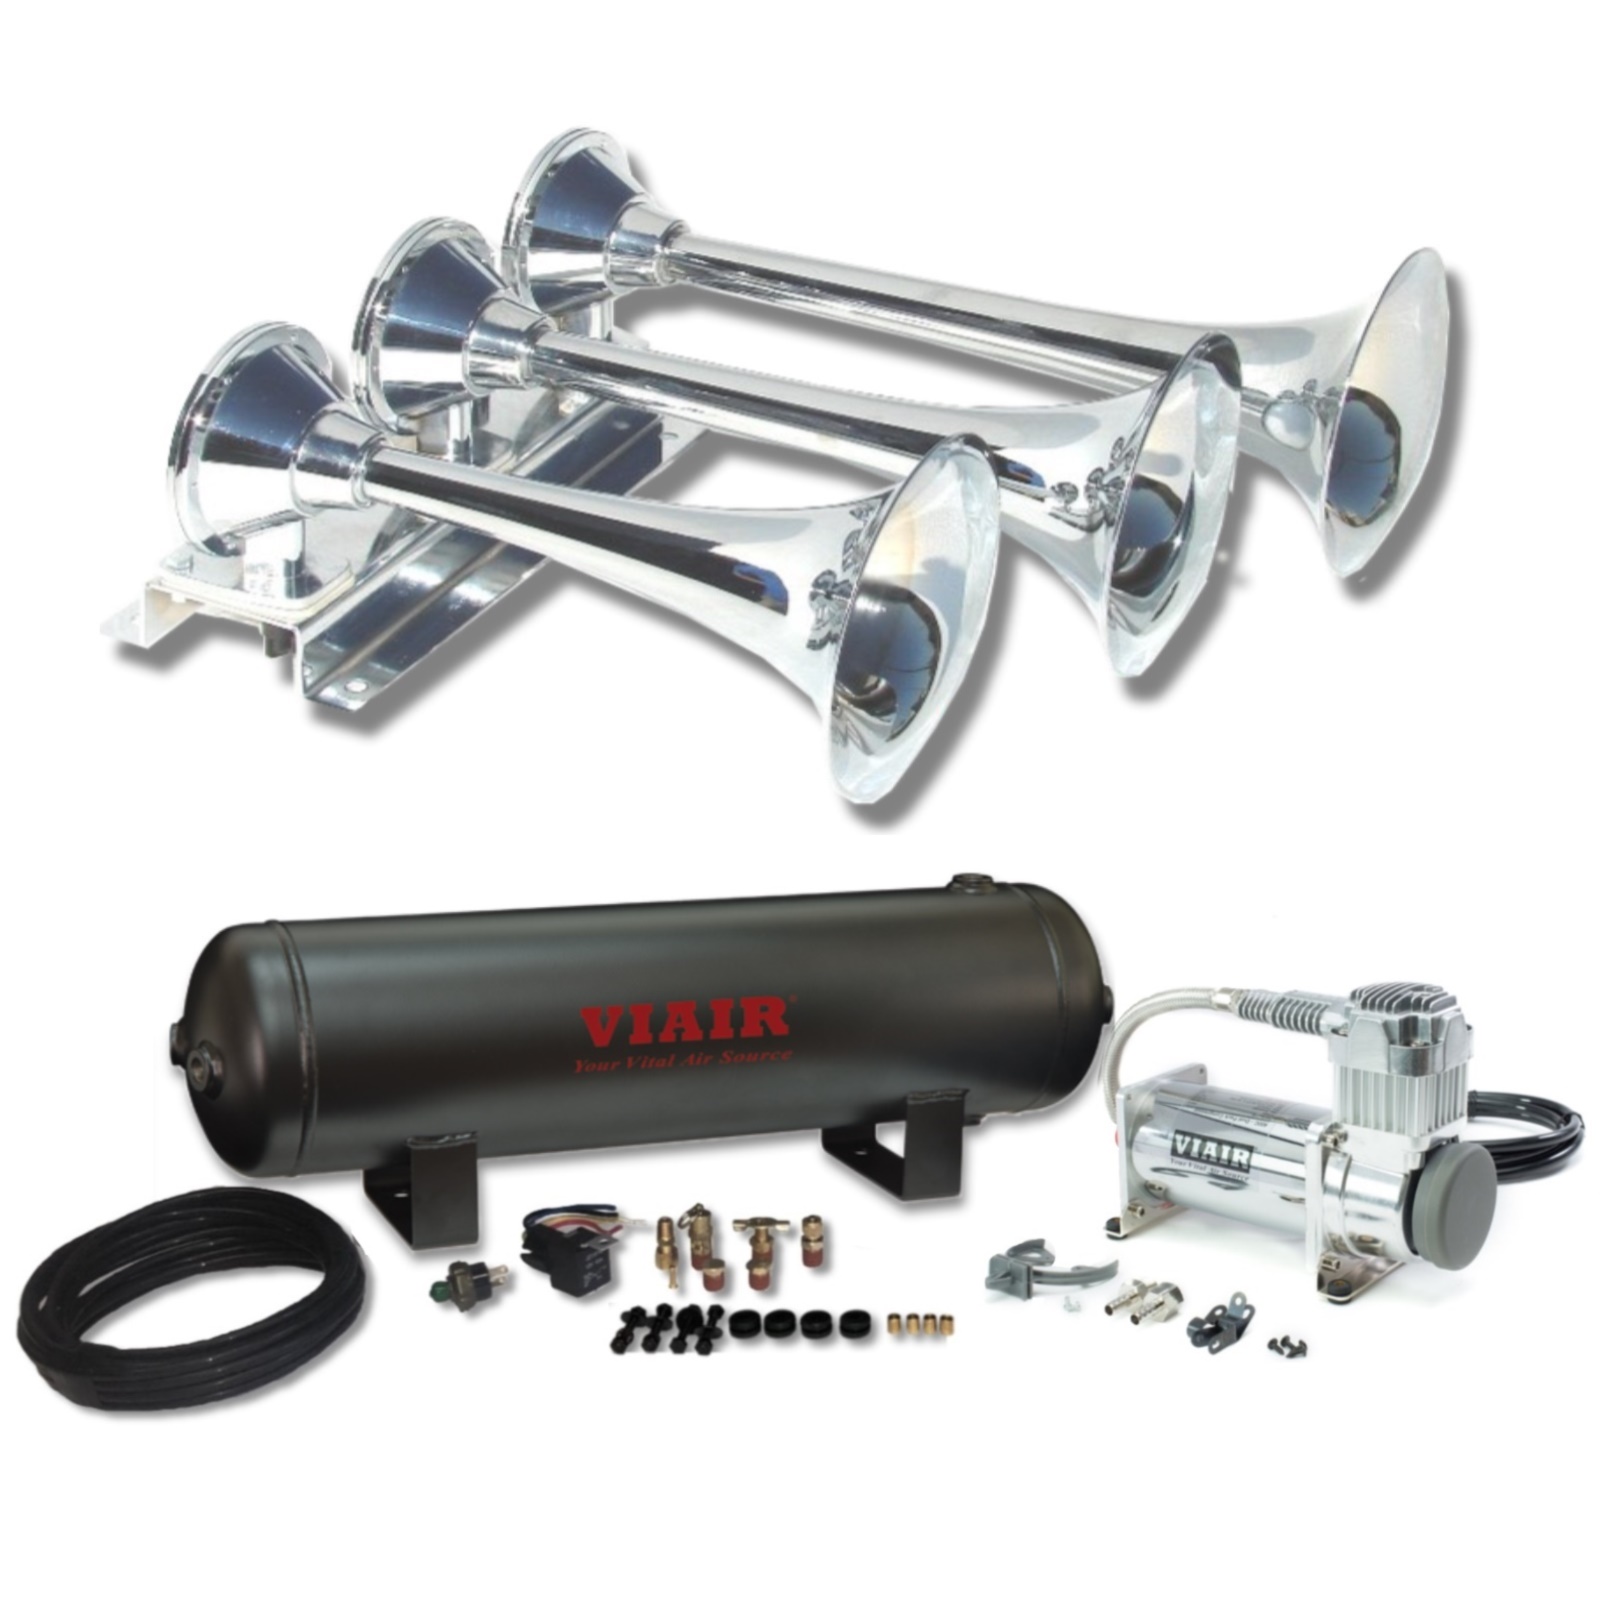
So whether you need an 12v or 24v system to supply air to your air horns, air suspension or out in the corn field to your tracker tire.  Assured automotive Company and VIAIR is your answer.

Posted on

Are Train Air Horns Legal For Use In Autos?

Are Train Air Horns Legal For Use In Autos??  That is the question Assured Automotive Company is  asked many times each day by potential customers.

As to date there is no Federal U.S. Law in the books making possession of a 152+db Train style air horn on a highway used vehicle illegal.  Although many local ordinances do have excessive noise laws.  Most ordinances have this law effective after sunset.

If an individual uses a train air horn recklessly, that same individual may be harassed by law enforcement officers.  Assured Performance Air Horns can be up to 152db loud!!  That kind of power can literally shake the ground.  That kind of power can also startle a person and will spike their heart rate.

It is great entertainment for many to shock sidewalk users by blowing the BEHEMOTH Train Air Horns and watching them jump out of their skin.  However, common sense needs to be used when doing this and it is NOT recommended by Assured Automotive Company.  There has been rumors floating around the web of terrible situations with pedestrians and air horns.  Stories of bicycle riders darting out into traffic after being blasted by one of the massive Train or Truck Air Horns.

These Air Horns can make your vehicle a safer place when driving down the road.  You can make fellow highway users aware of your presence. They even will help when wildlife is in the middle of the road you are traveling.  The sound of one of these horns usually will send the wild animal scampering off the road.

Assured automotive Company does ask all drivers of vehicle equipped with a Train or Truck Air Horn to use them responsibly and respect others around them.

Posted on

On Board Air Systems-Not Only for Air Horns

viair 10007

If you ever walked up to your ride and noticed you had a flat tire.  You will wish you had an on board air system installed on your vehicle.

Assured Automotive Company has a complete line of VIAIR On Board Air systems in stock.  AACo will know what fits your application and your needs.

What type of vehicle are you  installing the VIAIR System on and what are your needs for the system??  Those are the 2 most important questions you will be asked by a knowledgeable representative at AACo.

When Air Systems range in price from $190 to over $700 there is no reason to install a system that is overkill.  On the other hand, you do not want to be underpowered.

VIAIR On Board Air Systems are great for supplying air for inflating tires, but can also be used to operate a pneumatic impact gun for removing the lugs.  It doesn’t stop there.  You can use your VIAIR On Board Air System to supply air to a set of train air horns.  Do you have air bag suspension for slamming or overloads??  You will have plenty of air for suspension needs.  If your4x4 has air lockers of course you will also have plenty of air for them too.

Assured Automotive Company supply’s VIAIR Systems for many commercial uses also.  Systems for vehicle tow services to mobile detail service that use the air supply for blowing water from crevices on the vehicles they are servicing.

With VIAIR On Board Systems ranging from 120psi to 200psi and from half gallon tank kits to 5 gallon tank kits, there is a bit to be considered.  Remember your needs for the system and possible future needs when picking out the correct VIAIR System for your vehicle.

Posted on

Train & Truck Air Horn Kit Install Part 1

Part 1 of 3

So you bought yourself an air horn kit for your ride.  Congratulations!!  There are many different applications that an air horn and a VIAIR on board air system can be install in. We cannot possible cover them all.  Below are some suggestions and things to think about BEFORE you install your new air horn kit.  Assured Automotive Company has been in the auto industry since 1994.  The sales staff and technicians got together to give you some suggestions.

PLACEMENT OF COMPONENTS

AIR HORN:When deciding where you are going to locate the air horn and the on board air system components you will want to pay special attention to the protection of those components.

The air horn(s) will need to be placed in a location were it is facing in a downward angle.  This will allow any contaminants that might enter the trumpets to drain back out.  You DO NOT want water, snow, mud, etc to sit in the diaphragm housing.  This will cause damage to the horn diaphragms and shorten the life of them.

The most popular spot for the under body horn mounting is behind the front bumper facing sideways.  Assured Performance 140db horns are small enough to fit there on “most” vehicles.   The Assured Performance BEHEMOTH 152db Series horns are sometimes too large to fit behind the bumper.  When installing the  BEHEMOTH-i Air Horn you can remove the trumpets from the manifold for easier mounting.  Face the trumpets any which way to make them fit.   Another popular place for the BEHEMOTH-i air horn for pickup truck applications is to place in a bed cavity.  Most trucks have a cavity on the passenger side, in front of the rear tire inside the fender.  Mounting the horn to the bed side of the cavity is ideal for any horn that might fit there.   The horn(s) can be mounted directly under the body, facing the trumpets sideways, backwards(so loud it doesn’t matter much) or even front wards.  Just be sure, again,  they are in a downward angle to allow contaminants to drain out.

In most cases, if this is the first kit you installed, it will take you longer to consider location of the horn and the air system than it will to actually take to install the kit.  We do advise you to take your time and consider ALL your mounting options.

The staff at Assured Automotive Company would be more than happy to assist you with any install or mounting questions you may have.  We are sure you will enjoy your NEW Assured Performance Air Horn for years to come.

Posted on

Train & Truck Air Horn Kit Install Part 2

Part 2 of 3

So you bought yourself an air horn kit for your ride.  Congratulations!!  There are many different applications that an air horn and a VIAIR on board air system can be install in. We cannot possible cover them all.  Below are some suggestions and things to think about BEFORE you install your new air horn kit.  Assured Automotive Company has been in the auto industry since 1994.  The sales staff and technicians got together to give you some suggestions.

PLACEMENT OF COMPONENTS

When deciding where you are going to locate the air horn and the on board air system components you will want to pay special attention to the protection of those components.

VIAIR 20000 Series Kits:  These VIAIR Plug-N-Play style kits are designed to be mounted upright with the compressor on top.  Idea location for mounting would be in a truck bed or a cabinet like on a RV or boat.  The reason for this is because of the drain petcock location on tank.  Also if you mount the unit other than upright, condensation can build up in the check valve, corroding it and shortening the life of it.

VIAIR Under Body Kits: These VIAIR kits are the most versatile when it comes to mounting.  The compressor is not mounted to the tank and this makes install a lot easier.  When finding a location for the components you will want to keep it away from vehicle parts that get extremely hot, like the exhaust.  In most cases you may not find room in the engine compartment for the compressor, let alone the tank.  Mounting the kit under vehicle is your only option.

If ground clearance is an issue, like a car, mounting the kit in the trunk  is a great option.  A lot of installers make a mounting plate and actually mount the compressor and tank to it.  Then, if car owner needs extra trunk space in the future the kit can easily be removed and reinstalled quickly.

Low ground clearance SUV many installers mount just the air tank in the SUV cargo area, then just mount the compressor under the vehicle.  Inside or just behind the rear bumper is the most ideal spot.

If ground clearance is not an issue like on large SUVs and pickups, compressor and tank can mount easily under the vehicle.  Mounting the tank to the actual under body will raise the tank high enough to it cannot be seen.

On any mounting you will want the compressor mounted to a frame rail or frame component. Mounting the compressor to a vehicle body panel will cause a vibration inside vehicle and compressor will be heard easily on the inside of vehicle.  The VIAIR compressors are oilless and can be mounted upright, upside down, side ways or any which way.  When locating a mounting spot you will want to consider being sure the unit is not exposed.  Road debris can get throw up onto the unit causing damage to compressor.  Mounting the compressor below the frame rail is discouraged.

When mounting the compressor and tank near each other, whether being in the same compartment or under the vehicle.  It is a good idea to keep the compressor within 12 inches of a air tank port.  This is so you can run the stainless steel braided compressor feeder line directly into the tank.  This is not required to do, but it allows the compressor to fill the tank more efficiently.

The staff at Assured Automotive Company would be more than happy to assist you with any install or mounting questions you may have.  We are sure you will enjoy your NEW Assured Performance Air Horn for years to come.

Posted on

Train & Truck Air Horn Kit Install Part 3

Part 3 of 3

So you bought yourself an air horn kit for your ride.  Congratulations!!  There are many different applications that an air horn and a VIAIR on board air system can be install in. We cannot possible cover them all.  Below are some suggestions and things to think about BEFORE you install your new air horn kit.  Assured Automotive Company has been in the auto industry since 1994.  The sales staff and technicians got together to give you some suggestions.

Now you have your Assured Performance Air Horn location decided along with were you are mounting your VIAIR air components.  You now need to put it all together. We will just focus on the VIAIR under body style kits.  These are kits were the compressor is not part of the air tank assembly.

  1. Connect the compressor stainless steel leader line to tank port.  Keep in mind you will want to use teflon tape or plumbers dope on all threads you are screwing into the tank. You will not want to use the port on lowest part of tank.  You will need that port for the tank drain petcock.  When screwing the compressor leader line into the tank pay special attention to not cross the threads.  DO NOT over tighten the leader line, see warning label on leader line.  If compressor is not located close enough to the tank to use the leader hose, use the “T” fitting and use 1/4 inch line included with the kit.
  2. Thread the VIAIR pressure Switch/Relay that is included in the kit into a tank port.  Wire the relay.  White wire to compressor positive wire.  Run the red wire with the inline fuse from battery to the red wire on relay labeled “battery”.  Pull fuse from inline fuse holder before connecting to battery terminal.  Run another wire from an ignition source inside the vehicle, like the radio circuit, to the switch panel included with kit.  Then run a wire from switch panel to the relay lead marked “trigger”.  Ground the black wire on relay and compressor.  Your system is now wired up.
  3. Run the 1/4″ air line included with the kit to the air horn solenoid.  Avoid kinking the air line. Avoid shape bends.  If your horn included a barbed fitting on the solenoid, remove the fitting and replace it with the compression fitting included with the kit.  Connect the air line to the solenoid.  Insert a compression fitting in one of the tank ports and connect the air line.  Included in the kit is a pressure safety valve for the tank.  It is a good idea to use this valve.  Thread the included safety valve in a vacant tank port.  On the most bottom tank port thread the included drain petcock into it.
  4. The Train Horn kits that Assured Automotive Company sells include air solenoids or electric air valves.  These valves is what allows the air from the air system to enter the horn manifold, thus sounding the horn.  When the solenoid receives 12-24 VDC it opens and allows the pressurized air to pass thru to the horn manifold.  You can use your existing horn switch(steering wheel) or you can incorporate a separate momentary switch.  With Assured Performance Air Horn Solenoids a relay is not required, amperage draw is only 3 amps.  Wire one of the solenoid wires to a 12v positive source.  Ground the other wire.  It doesn’t matter which wire you use for the positive.
  5. You are now ready to air up.  Double check all your wiring and air line connections.  When everything checks out, insert fuse into the inline fuse holder.  Start your vehicle, Switch the panel switch to ”on”.  Compressor will begin to fill the tank.  Depending on compressor size and tank size this could take anywhere from 1 minute to 5 minutes to fill to 150psi.  Being sure everyone within 100 feet of vehicle has ear protection, you can now test the horn.
  6. Last step.  With a spray bottle of 1 part dish soap and 5 parts water, spray all the air fitting on the system checking for leaks. Fix leaks by either tightening fittings or using extra teflon tape or plumbers dope.
  7. ENJOY!!

The staff at Assured Automotive Company would be more than happy to assist you with any install or mounting questions you may have.  We are sure you will enjoy your NEW Assured Performance Air Horn for years to come.

Posted on

“BEHEMOTH” Air Horn/VIAIR 20005 Kit Install F150

Joe of Memphis Tennessee sent us some photos explaining his install on of the BEHEMOTH Train Air Horn – VIAIR 20005 Kit from Assured Automotive Company on his 1989 Ford F150. Joe purchased this kit in December, and had it installed in no time!!

The pictures below show the mounting of the “BEHEMOTH” Triple Trumpet Air Horn.  Joe mounted the trumpets on the passenger side of his F150 in front of the rear wheels, outside of the frame rail.

Joe aimed the trumpets at a downward angle to help ensure proper drainage of contaminants that get into the trumpets, preventing trouble down the road. As you can see from the second picture, the horn cannot be seen when looking at the truck from the side.

The next step was wiring the horns.  Joe wanted to use his OE horn switch(steering wheel) to activate the air valve on the BEHEMOTH air horns. He also did not want to loose the ability of use his original horn if needed.  He installed a 3 way switch on his dash(see photo below) were he can flip the switch from street OE horn to BEHEMOTH Air Horn. The air valve (solenoid) on the BEHEMOTH Air Horn can be used on a 12v-24v dc electrical system. The solenoid has 2 wires, one is ground and one is positive coming from your switch. It does NOT matter which wire you use for ground/positive.

Now Joe has the horn mounted, it is time to install the VIAIR 20005 air source.  Joe decided to mount the VIAIR 20005 Compressor Tank Combo behind the rear seat of his F150.

The compressor can be loud when running, so this might not be the choice mounting spot for everyone.  Joe installed a piece a 3/4″ aluminum square tubing about 18 inches long. He bolted the VIAIR 20005 unit to that, then secured the tubing to the interior floor board with self tapping screws.

Joe ran the wiring and the air line for the unit through an existing hole in the floor board.  Joe wired the system using a relay so the compressor will only turn on when his truck ignition is in the on position.  He also used a 20 amp inline and wired directly to a battery 12v terminal.

Great job with the install Joe!!!

It looks AWESOME!!!

All of us at Assured Automotive Company appreciate your info and photos

Posted on

2009 Porsche Cayenne GTS-Air Horn System Installed

Jon H. from Virginia sent us some pics and info of his 2009 Porsche Cayenne GTS six speed with an Assured Performance Horn and Viair Air System

Jon purchase our 140db Dual Trumpet Truck Air Horn Kit with the Viair 400c Compressor and 2.5 gallon Tank Kit.

The truck horns went in behind front Right fender liner without much problem.

Left side was too crowded to use.

As you can see the horns are facing forward for the ultimate sound.

The Viair Tank, pump and controls went into Left Rear Quarter panel storage area.

We ran 40A line from battery, and relay current from the 12v outlet in photo. Controlled by steering wheel Horn button.

The pump is quite loud attached to the inner fender, but is ON so seldom that it is not a problem.

We needed additional hi pressure hose, so used some 150# truck brake line hose. It is more pliable and easier to install.

The kit was complete and the instructions were excellent. Installation took 12 hours.

It is of course VERY loud. The only thing I would change is someday perhaps to a lower note. I am looking for ‘Ocean Liner’ sound.

“Highly recommended. Thanks”

Assured Automotive Company Thanks Jon for the pics and info!!